Disclosure: This post may contain affiliate links, meaning, at no additional cost to you, I will earn a tiny commission if you click through and make a purchase on any of the materials linked below. I will likely blow said commish on Spicy Margaritas.
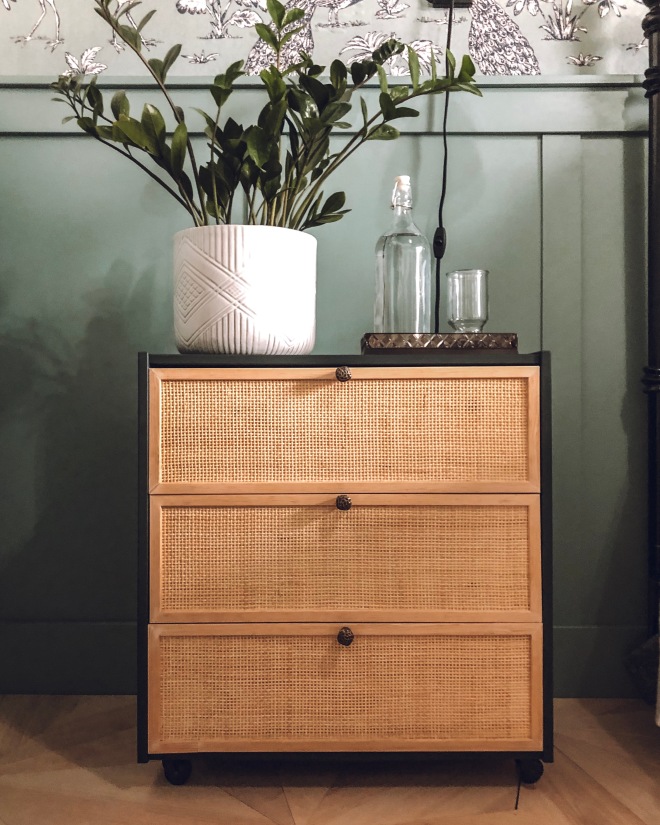
I know I’m not the only one who’s been super inspired by the beautifully caned furniture pieces taking the internet by storm. While I don’t consider myself a sucker for trends, I am downright smitten with the simple texture, natural elements and ease in which caning can elevate a piece.
I was on a quest for an affordable nightstand option to round out our guest room for the Fall 2019 One Room Challenge and the budget was already stretched. But I was confident I could thrift something rad for around $50 and put my own weird little spin on it. After a couple of weeks of hunting, I came up empty handed and looking for plan B. Enter Ikea, and their stacks upon stacks of unfinished furniture, packaged neatly in inexplicably small boxes, just waiting to be hacked. I had a few ideas of what I wanted to do, but let my Instagram Story watchers take the reigns. They’re my backbone y’all; and sometimes I just need my people to tell me what to do. The people wanted caning. Scratch that. The people were HELL BENT on caning. So I dug into my research.
Here are a couple of the stunners I found that inspired this particular Ikea hack.

Pottery Barn’s Dolores Cane Buffet 
Urban Outfitters Marte Tall Dresser
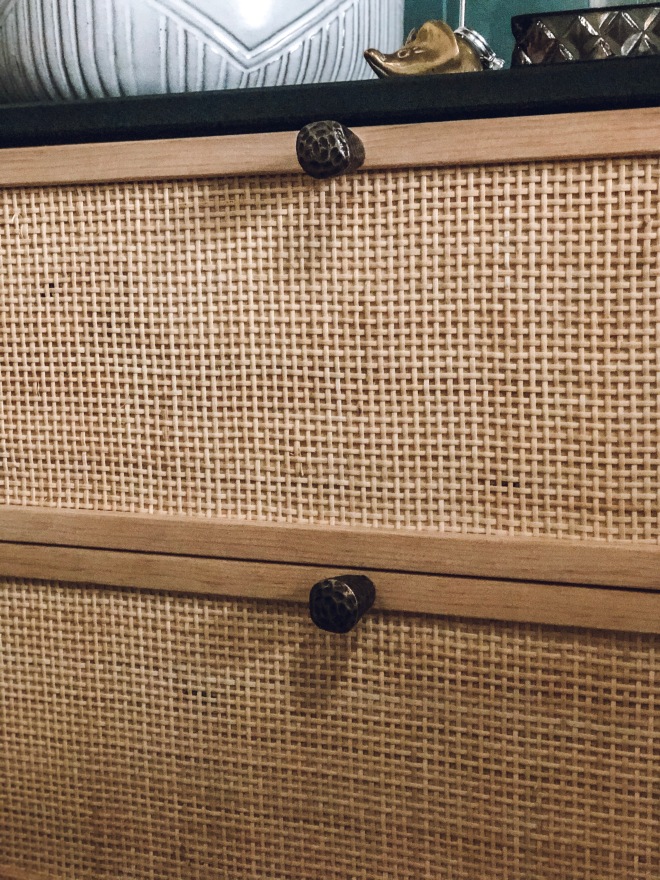
So good right? I love the thin trim and small knobs on the Dolores and the Marte gave me a perfect visual for a small dresser. I’m feeling inspired. Let’s do this!
Quick preface: This nightstand was a series of trial and error, therefore some of what you see in pictures is NOT what you’ll see in words. If I were to make this again, I would do it the way I’m explaining it, not the way I actually did it. Just follow mom’s rule and do as I say not as I do mmkay?


Supplies & Tools Needed
- Ikea RAST Chest of 3 Drawers
- Wood Putty
- Caning Material (2ft x 24″)
- 17 Linear Feet (LF) of Pine Screen Trim
- 13 LF of 3/8″ x 2″ Pine Mullion Molding
- Wood Glue
- Set 4 Plate Casters (I used vintage stem casters)
- 5/8″ x 3″ x 24″ piece of scrap wood
- Paint (I used Sherwin Williams Jaspar)
- Paint roller
- Drill
- Drill Bit (sized to match hardware screws)
- Extra wood screws 1 1/2″
- Electric Staple Gun
- 1/2″ Staples
- Hammer
- Flat head screwdriver
- Phillips screwdriver
- Vice Grips
- Miter Saw

SHOW ME WHAT YOU’RE WORKING WITH

Open your Ikea Rast and lay out all the pieces.
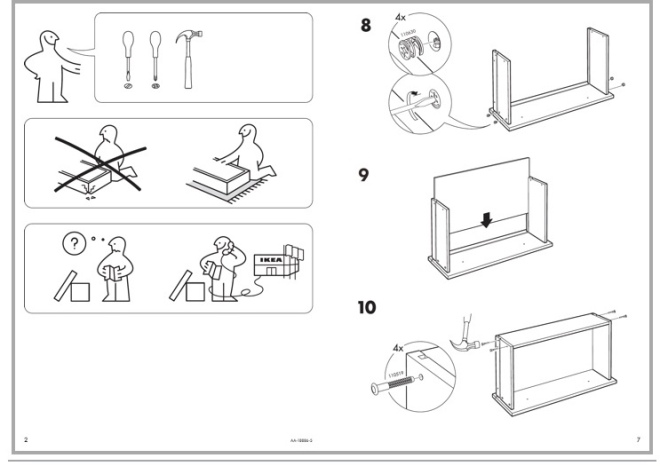
Identify the wooden ‘Base’ parts which will be comprised of a top piece, two sides, and two bracing pieces. These are the pieces identified in steps 1-5 of your Ikea instruction manual.


Identify all the drawer pieces. This includes three drawer fronts, 3 sets (2 each) of sides, 3 backs and three bottom pieces. These are the pieces identified in steps 6-10 of your Ikea instruction manual.
THE BASE:
MEASURE AND CUT YOUR BASE
If you prefer a more square finished piece as I’ve created vs. the rectangular shape (as the piece comes) you will want to trim your sides down. If you prefer to keep the original shape of the dresser, you can skip this section entirely and jump right into Painting & Assembling Your Base.
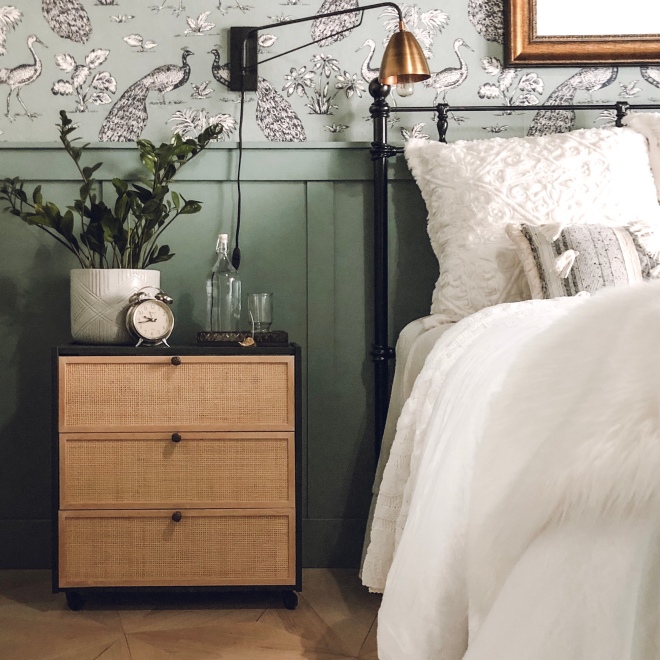
My squared off Rast 
The OG Rast
TBH, I’m not a big fan of the ‘kick plate’ at the bottom of the dresser. Plus, I’m using this piece as a bedside table. So it made sense for me to trim it down to a more appropriate height.
Using your miter saw, cut the bottom 3 1/4″ inches from the two side pieces. Your cut should be below the predrilled hole where the bottom support piece (I call this the kick plate) is to be installed. (*UPDATE: I’ve received feedback from a few that have completed this tutorial that the cut is shorter on some Rast dressers. It should be made below the predrilled hole, but also allow enough clearance for the bottom drawer to open and close without getting stuck. USE YOUR BEST JUDGEMENT HERE!)

*This kick plate will be rotated 90 degrees upon install so that the edge is facing front and the front is facing down.
PAINTING & ASSEMBLING YOUR BASE
Grab your stack of ‘base’ materials and paint all sides and faces of each of your wooden pieces (not counting the dowels). Allow them to dry fully before assembly.

Assemble your base according to the IKEA instructions in steps 1 & 2.
At step 3, you’re going to veer off course a bit. Install the center brace per instructions. When you get to the kick plate, Do NOT add dowels. Instead, use the two screws given to screw the kick plate into the predrilled hole as instructed. Do not tighten screws fully.
Rotate your kick plate parallel to the floor (mirroring the center brace) so that the top of the kick plate is facing outward and the face is pointing down. From the front, it should look like the top and bottom are the same.

(*Note: This stage looks a little bit different for me because the vintage casters I chose to use had to be installed into 2″ thick wood. As such, I needed to cut my kick plate down to 1 1/2 inches to allow space for wooden blocks to be installed. Your project at this step will look a bit different from the photos I’m sharing.
STOP HERE AND MOVE ON TO THE DRAWER ASSEMBLY BEFORE YOU CONTINUE! YOU WILL WANT TO MAKE SURE YOU HAVE ENOUGH CLEARANCE FOR THE DRAWERS TO OPEN AND CLOSE BEFORE DRILL ANY MORE HOLES FOR SUPPORT.
THE DRAWERS:
PREPPING YOUR DRAWER MATERIALS
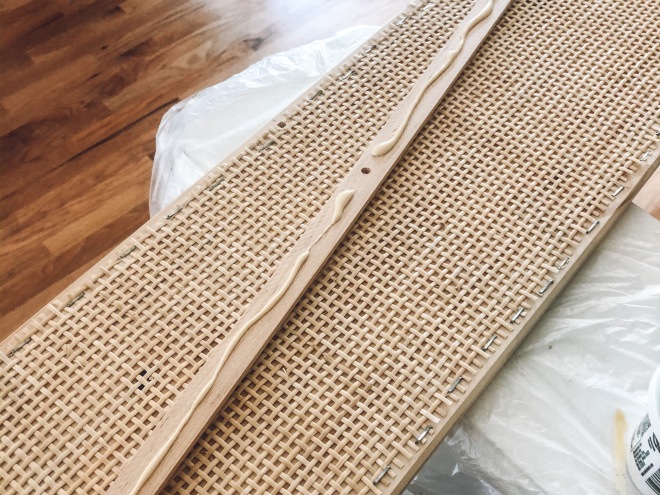
Fill a bathtub with water and soak your caning material until it is flexible and easily unrolled. I left mine overnight, however 30 minutes should suffice.
Once saturated, unroll the material onto a large bath towel, cover with another towel and place books or a large piece of wood on top to allow caning material to flatten for 15-20 minutes.

*DO NOT LET CANING DRY COMPLETELY as it is more malleable and easier to work with when it is dampened. If your material dries out, simply give it another soak and try again.
Grab your three drawer fronts (identifiable by the two pre drilled holes in each piece) and fill the pre drilled holes with natural colored wood filler.

Once dried, sand until putty is smooth and flush with drawer fronts.

*Note: you’ll notice my drawers are fully assembled in photos at this stage. That is because I am working this out as I go. I ended up having to take them apart and put them together multiple times during this process just to test things out. That said, It may be a good idea for you to put your drawers together (following Ikea instruction manual steps 6-10) just to ensure everything is lining up as it should and that all drawers open and close properly. Pro tip: Keep your screws somewhat loose so they are easily taken apart again. The drawers will need to be fully disassembled for caning.
PRE DRILL DRAWER FRONTS FOR HARDWARE
Find the center of your drawer front (length). Mark the center with a light pencil line at the top of the drawer.
Next find the center of the width of your screen trim. If your screen trim is 3/4″ wide, measure down from the top of the drawer front half that width, in this case 3/8′, to mark where your hardware will be installed on the drawer front.
Using a drill bit that is the closest match to your hardware screws, pre drill a hole into the spot you measured for each of your three drawers.

CANING YOUR DRAWER FRONTS
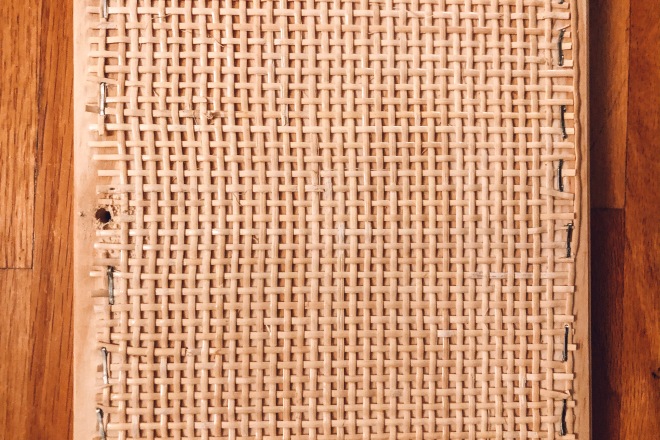
Align the caning material on your first drawer front and cut out a piece as close to the edge as possible.

Staple the along the edges ensuring that the staples are not too close to the edge as to be seen, but also will be covered by the screen trim. Smooth and straighten the caning material as you work to ensure it is completely flat.
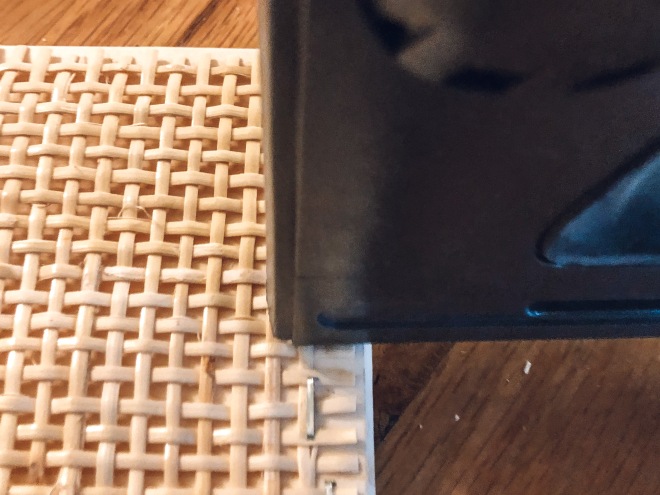
Hammer down or remove any staples that do not go in all the way. Staples should be as flush to the wood as possible.
Trim any overhanging material away. Cut away any caning that covers your pre drilled hardware hole.
MEASURE & CUT DRAWER TRIM
*I did not take pictures of this step! Essentially you’re creating your drawer trim as seen in the photo below.

Each drawer will be trimmed out with screen trim.
To do this, you’ll measure the length and width of your drawer front. Cut your screen trim to fit flush to the perimeter of your drawer.
For a more finished look, miter each corner at a 45 degree angle as I’ve done above.
BACK TO THE ‘DRILLING BOARD’
In this step we’re going to pre drill our screen trim for hardware.
I’ve included a short video of this process to give you a visual as well.
Clamp your top piece of screen trim into place ensuring it is as evenly aligned with the top and corners as possible. Use multiple clamps to reduce the chance of movement.

Using your drill bit, gently drill through the back of the drawer front through the screen trim until the drill fully exits through the front.


AFFIXING THE DRAWER TRIM
Apply a line of wood glue to the back of the screen trim and clamp it into place.

Wipe away any glue that squeezes onto your caning.
Carefully fill the small gap between the screen trim and the drawer front along the outside edges with wood glue or wood filler in the way that you would caulk a seam.

Keep the clamps in place until the glue/putty is fully dried.
Repeat these steps with each piece of trim.
Screw your hardware into place.
Fill the seams where the trim pieces meet up with wood filler and sand away excess.

Assemble all the drawers according to your Ikea instruction manual and install the drawers into the base.
SECURE THE BASE:
Now that your drawers are installed, it’s time to secure the kick plate with a second screw. If you are planning to install casters or ‘legs’ any kind you will first need to build a base.
You’ll also want to make sure you can fully open and close your bottom drawer without any part of it getting hung up on the kick plate before you secure it in place.
To secure the kick plate, pre drill a pilot hold for your your 1 1/2″ wood screws by selecting a drill bit that is the same size as the shank between the threads of your screws.
Hold the kick plate securely in place and drill through the side of the dresser into the ends of the kick plate.
Insert your wood screw but do not fully tighten just yet. Repeat with the second side.
In most cases, your plate casters can be screwed directly into this newly secured kick plate. If you are using stem casters like mine, you will need a something similar to what I’ve done here. But for the sake of simplicity, plate casters will be much easier to use.
Next you’ll want to cut and secure an additional piece from your scrap wood to duplicate the kick plate on the back side of the nightstand. This will provide the base for your second set of casters.
*If you’re not installing casters you can skip this step.
Measure and cut a second “kick plate’ piece from your scrap wood. Install it on the backside of the stand by pre drilling two pilot holes on each side of the nightstand into the kick plate.
Secure with wood screws.
Go back and tighten your wood screws on the front kick plate.
You’re ready to install your plate casters directly into these two bottom support beams.
Follow the instructions in your caster kit for specific installation. I recommend placing them as close to the corners as you can to allow for maximum stability.
If you’re so inclined, you can trim out the sides of your nightstand to cover your exposed screw heads with pine mullion molding. I intended to do this, even bought all the supplies. But when time is of the essence and you’re on a wicked deadline you cut all kinds of corners. This was one of those corners. That said, if you’ve made it this far, I have no doubt you’re capable of trimming this out on your own.
Thank you so much for your interest in this project! I hope you’ve found the tutorial to be informative and helpful. If you’re inspired to tackle your own Ikea Rast hack in some capacity, pleas tag me on Instagram so I can share in your success!
Thanks for being here!
XOXO,


Fantastical ! Bravo !
LikeLike
Thank you!!! Thanks for stopping by to read it!
LikeLike
Hi, I loved ur IKEA hack. Also random question, but where did you get that warm gold frame above ur bed? I’ve been looking for one to put in my room.
LikeLike
That Frame is from Michael’s craft store!
LikeLike
Wow! This is an AMAZING Ikea hack!! Thank you for sharing your process!! 😀
LikeLike
Thank you! It’s my pleasure! Hope you found it helpful!
LikeLike
I love your drawers, so beautiful!! I really appreciate you listing down the materials, instructions, and even providing a video! Thank you so much! I’m going to try to create one during this quarantine :))
LikeLike
Absolutely! Glad you found it to be helpful! Thanks so much for taking the time to read. 🙂
LikeLike
This is beautiful! How many feet of the cane webbing did you use?
LikeLike
I ordered 2 ft. and still have some left over! I would guess maybe 18″ x 24″ total.
LikeLike
hi, random question but what shade of green is that on the wall behind? ive been looking for some paint like that for my bedroom wall, thnx
LikeLike
It is Sherwin Williams Valiant Blue
LikeLike
I absolutely love this! Just waiting for those Rast chests to be back in stock for shipping and I’m going to do this!!! Can I ask you what finish the paint is in? I love flat/matte finishes but I’ve found for wood furniture they’re hard to wipe/dust. Thanks!
LikeLike
Thank you so much! I am SO glad that you love it! Please let me see your final product! I would love to cheer you on too!
LikeLike
Could you tell me what finish the black paint is?? Satin? Matte?
LikeLike
It is a matte finish but not what I would have chosen if I were to do it again. I just used what I have. If you prefer the look of a matte finish I would definitely recommend sealing with a matte Polycrylic or using a chalk paint!
LikeLike
Beautiful! Where did you get that wall lamp?
LikeLike
World Market!
LikeLike
LOVE this! Thanks for the tutorial. I’m currently redoing a bedroom and this is perfect! I also love the wall lamps. Would you share where you got them?
LikeLike
World Market!
LikeLike
So beautiful! I want this for my room!
Do you find the drawers are easy to open ? I’ve read a lot of reviews that the rast drawer slides are not so great.
LikeLike
They are NOT easy to open! Quite frankly they’re a giant pain! But we don’t use the drawers often and it still makes a pretty cute guest room nightstand!
LikeLike
Hi!! Love this idea, I’ll have to give it a try in my new apartment. I was wondering about the wall light you have above the bed. Where is it from? It’s just what I have been looking for for nighttime reading and the brass is beautiful!
Thanks!
LikeLike
Hi!! Love this idea, I’ll have to give it a try in my new apartment. I was wondering about the wall light you have above the bed. Where is it from? It’s just what I have been looking for for nighttime reading and the brass is beautiful!
Thanks!
LikeLike
Thank you! It’s from World Market. 🙂
LikeLike
I’m getting hung up on the first step. The predrilled holes at the bottom of the side pieces is only 7/8” from the bottom. There is a second hole for a peg that does not go all the way through to the outside that is 2 1/8” from the bottom. Either way, if I cut off 3 1/4” from the bottom, both of those hole will be removed with the cut. Can you clarify that the cut should be at 3 1/4” from the bottom?
LikeLike
I’m getting hung up on the first step. The predrilled hole is only 7/8” from the bottom on the sides. There is a second hole for the dowel that is 2 1/8” from the bottom, but that hole does not go all the way through the side. If I cut 3 1/4” off the bottom, both holes will be removed with the cut. Your instructions suggest that the predrilled hole for the kick plate would be more than 3 1/4” from the bottom. Can you clarify?
LikeLike
So I’ve had a few comments like this and it seems all of our measurements are a bit off! I went almost directly center between the two holes. I would just play with it a little bit to see how far down your bottom drawer hangs and just make sure you can clear it! So sorry for the delay in my response!
LikeLike
Love this so much! Did you use any finish on the trim? If so, what was it?
LikeLike
I did not! Just left it as is!
LikeLike
Omgsh! I love this! And just bought the cane webbing only to realize it’s the hexagon cane kind! Do you think it’ll still work or show too much of the wood behind it??! 😂😂😂😂
LikeLike
Omgsh! I love this! I ordered the cane webbing from amazon and just realized it’s the kind with the hexagon spaces!! Ah! Do you think it’ll give the same effect or show too much of the wood behind it!? Trying to decide if I should return it and order the kind you used or just go with this one. 🤣🤦🏼♀️
LikeLike
I think it will look just fine!!
LikeLike
Amazing Job, they look incredible and expensive. Im really interested in doing this DIY. However, i am a little confused about the trims. Whats the difference between the pine screen trim and the pine mullion moulding? Do you need both type of trims?
LikeLike
Thank you! The screen trim is what I used on the drawer fronts. The Mullion is used to trim out the sides to cover the screw holes. I never ended up doing it (95% club right here) but plan to at some point! Hope that helps!
LikeLike
Amazing! I will be attempting to do this today. May have some question! 🙂
LikeLike
Happy to help! Good luck!
LikeLike
Hi! I have been waiting since the end of August for my caning material to be shipped from the Online Fabric Store. Do you have another resource for affordable caning material?
LikeLike
Oh no I’m so sorry to hear this! Online Fabric store is the only place I’ve purchased caning from before but hopefully a google search will turn up other options???
LikeLike
This is the absolute nicest ikea hack i found on the net!
LikeLike
Thank you!!! What an awesome compliment! I so appreciate you taking the time to say so. xoxo Meg
LikeLike
Where is this lovely wallpaper from?
LikeLike
That is actually a World Market shower curtain I pasted to the wall! 🙂 I have a tutorial on how I did it here: https://roostramble.com/2020/01/15/diy-fabric-wallpaper-tutorial/
LikeLike
Totally unrelated, but, your wood floors are amazing! I’ve never seen anything like it. Was that also a diy project or did you buy the wood already in triangles like that? I would love to recreate this in my house.
LikeLike
Thank you!! They were a (painfully tedious) DIY! I have a tutorial for them on my blog! DIY Geometric Plywood Floors! 😉
LikeLike
By adding the screen trim on the drawer fronts, do you find that the drawers stick out/protrude from the base, and does it look funny?
LikeLike
No not really. The doors aren’t flush with the cabinet to begin with so it works out great!
LikeLike